Don’t just power up
Really, don’t. First, be sure that you’ve read the board’s instructions about how to connect supply voltage to the board, and make sure you understand and follow them. Just connecting what seems to be logical may end up with a destroyed board.
Also, since the board runs Linux, you can’t just power it off without taking the system down, or the filesystem on the CompactFlash may have inconsistencies. So try to power the board up only when you’re ready to take control of it.
The console
There’s a USB-to-UART chip on the board, so the Linux’ serial console can be accessed by any PC. Connect the computer to the mini-USB jack farther from the Ethernet jack (as shown in the image below). Then set up your favorite terminal application (Hyperterminal, PuTTY, minicom or whatever) to work at 9600 baud, 8 data bits, 1 stop bit, no parity and no flow control (a.k.a 9600 8-N-1). This setting matches the one used by Xilinx’ demo utility, which came on the CompactFlash supplied along with the board, so you can test your setting with that one.
There may be a slight problem setting up these settings on a Windows computer, because the COM port belonging to the card doesn’t exist while the card is powered off. On the other hand, you don’t want to power on the board with Linux before the console is set up. The easiest way around is to power the board on without the CompactFlash installed, set up the terminal application, and then power off.
Also note that when you power off the card, the COM port disappears from a Windows system, and when you power it on again, the terminal program will most likely not reconnect to the “new” COM port which just showed up. This can lead you to thinking that the card doesn’t output anything, when in reality everything works fine, but you’re just looking on a terminal window expecting data from a COM port which is gone long ago.
So remember to close the terminal application when powering off the board.
The expected output on the console as Linux boots up is available on a dedicated page.
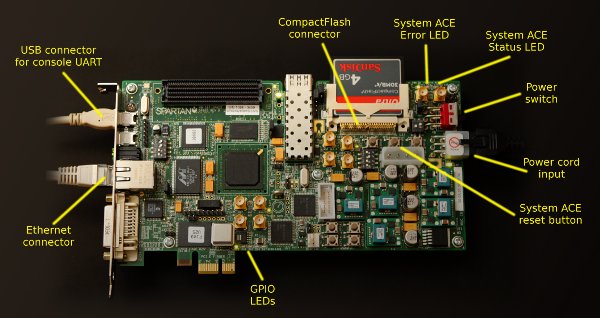
SP605 Board components
This is a short summary of the relevant elements of the board. See image below.
(ML605 users: You will find the same components in different positions. No GPIO LED is blinking on ML605 boards)
- The USB jack for the console was described above.
- The Ethernet jack needs not to be connected for proper boot, but connecting to the board over some network will make things easier.
- The CompactFlash connector and the CompactFlash card. The card depicted is a SanDisk, which is what you should use too.
- Close to the card, there’s the System ACE Status green LED. It will blink while the xillybus.ace file is being read into the FPGA, and go on steadily when that is finished. Note that the LED will be blinking during two phases of the load process: First, loading the FPGA with its bitstream, which is relatively quick, and then the Linux kernel is loaded. So when the LED goes steady, the Linux kernel should start running. A flash with electronic problems may cause a steady green LED with no Error LED lit even though the process wasn't completed. Yet another reason to work with SanDisk devices only.
- The System ACE Error red LED will go on if something goes wrong with loading xillybus.ace. This may be a result of forgetting to copy the xillybus.ace to the CompactFlash or not unmounting the flash before disconnecting it from the computer. It can also be a result of a faulty CompactFlash card, in particular if a non-Sandisk card was used. Or any other problem with loading the flash. Note that flash errors may lead to a faulty load, and yet this LED remains unlit.
- The System ACE reset button can be used to re-initiate a boot after the system has been properly halted. This eliminates the need to repower the board (and restart the terminal application)
- The power cord input: Again, please refer to the SP605’s instruction manual about this.
- The power switch. Switches the main power supply on and off.
- GPIO led #1 (marked DS3): This LED blinks when the FPGA is configured with its bitstream. Hence it will start blinking before the System ACE status LED goes steady. Note that it has nothing to do with Linux. The LEDs adjacent to it indicate use of the Xillybus peripheral interface.

Click on image for a larger view
Next recommended reading: Getting around I: General
