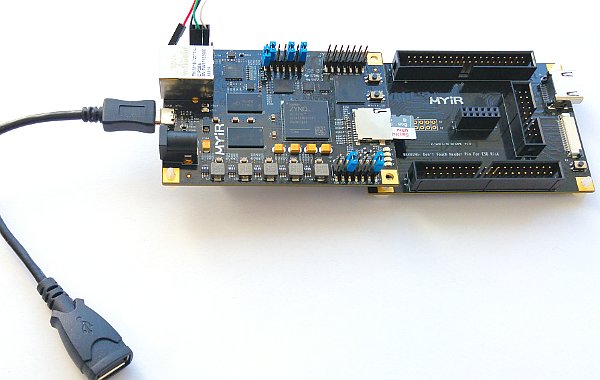
Z-Turn Lite board (to the left) attached to the Z-turn Lite IO Cape (to the right)
Note that nothing holds the board to the left.
General
For most scenarios, the Z-Turn Lite suite is the most suitable and cost-effective solution for Xillinux. While the hardware itself is well designed, the vendor's product naming and part numbering is somewhat confusing. This page attempts to assist with the selection of items for use with Xillinux.
Xillybus and MYiR are not affiliated. All written below should be treated as general advice, and verified with MYiR's resources prior to any purchase.
The relevant products
- Z-turn Lite Kit (part numbers MYS-7Z007S-C or MYS-7Z010-L-C): The board itself plus power supply and some cables.
- Z-turn Lite (part numbers MYS-7Z007S-C-S or MYS-7Z010-L-C-S): Exactly like the Z-turn Lite Kit, but without the power supply and cables, saving ~20 USD. The choice for those having the relevant stuff lying around anyhow (more on this below).
- Z-turn Lite IO Cape (part number MY-CAPE002): An extension board, which carries the HDMI connector as well as other I/O connectors.
Recommended for running Xillinux:
- Option 1: The Z-turn Lite Kit + Z-turn Lite IO Cape
Alternatively, if you want to save some money on the cables:
- Option 2: The (non-kit) Z-turn Lite + Z-turn Lite IO Cape
Either way, be sure to get the Z-turn Lite IO Cape. Without it, there's no connection to a computer screen. Consider 3D-printing a plastic leg for keeping the pair steady on a flat surface.
Also, don't get confused with the non-Lite boards and accessories, in particular as MYiR's part numbers are strikingly similar. These are completely different boards, with an incompatible interface between the Zynq device and the HDMI output. Xillinux runs only on Z-Turn Lite, and porting it to the non-Lite Z-Turn board is anything but trivial.
So before making a purchase, verify the part number character by character, and be sure to have the word "Lite" in the product's description.
Regardless, you're going to need a SanDisk MicroSD with 8GB or more (not purchased from MYiR).
The LCD module supplied by MYiR, MY-LCD70TP-C 7, is not supported by Xillinux.
Z007S or Z010?
The Z-turn Lite board is capable of carrying one of four Zynq devices, Z007S, Z010, Z014S and Z020. Only the first two are available off the shelf.
The devices differ primarily by the amount of FPGA logic resources -- the part numbers are roughly proportional to the number of logic cells. For the purpose of running Xillinux out of the box, even the smallest device, Z007S, provides more than enough resources (~ 30% logic used, including Xillybus streams, Xillybus Lite and HDMI related logic).
Another aspect is single-core vs. dual-core ARM processors: The Z007S and Z014S are claimed to have a single-core ARM processor (this is yet unclear) while Z010 and Z020 are known to have a dual-core ARM.
Either way, as far as interactive user experience goes, there is a barely notable difference between a single and dual core (tested with the "nosmp" kernel command). So except for CPU intensive multithreaded applications, there's hardly any advantage with the dual-core devices. On the other hand, the price difference of is hardly an issue either.
Why "kit" version
Unless you buy the "kit" version, you'll need the following pieces of equipment:
- A proper 5V / 2A DC power supply with a standard DC power plug (not a USB plug). "Proper" means switched, giving a accurate and stable DC voltage. The 5V voltage is used directly on the board's USB port.
- A Micro B to Type A female USB cable for connecting the mouse and keyboard. Note that this is not the typical charger cable for cellular phones (which is Micro B to Type A male, not suitable here).
- A UART to USB adapter: The board supplies the serial console as three pins at 3.3V LVCMOS levels (may not be necessary, see below).
- An Ethernet cable (recommended, allows connecting the board to the network)
Do you need the UART to USB adapter?
The UART interface is the board's serial console, which carries the U-Boot's initial boot messages and control interface, then the initial Linux kernel boot messages, and finally a Linux shell console.
If you don't intend to use a keyboard and HDMI monitor, this is the only way to access the Linux system (until ssh access has been set up, if at all). So if you're not going to purchase the IO Cape board, an UART adapter is a must.
However in a keyboard + HDMI monitor setting, the main purpose of the serial console is to figure out why Linux doesn't boot up, if and when that happens. Other than that, the UART adapter is not expected to be used much, so if the instructions for setting up Xillinux are followed carefully, it's possible to manage without one.
The connection of a USB adapter to the board is seen at the top-left corner of the board in the image above, next to the Ethernet plug. The wiring with most adapters out there is Black to pin marked GND on the board, Green to RX, White to TX.
I/O pins
The Z-Turn Lite board itself doesn't expose any pins for application I/O directly, but routes a large number of them to a single connector on its back side, which mates with the Z-Turn Lite IO Cape board. The latter exposes some of these pins to the HDMI plug, and others to 68 I/O pins and a push button.
All of these 68 I/O pins are wired to two 40-pin connectors, J3 and J8, to which standard 40-pin flat ribbon cables can be attached. Each of these pins can be individually connected directly to either FPGA (PL) logic on the device, or to the standard GPIO interface of the Linux host running on the ARM processor. Out of the box, Xillinux routes 34 of these pins between FPGA logic and J3 (driving them all low), and the other 34 pins between Linux' GPIO and J8.
The top-level module of the Vivado logic design that arrives with Xillinux defines the use of each of pins of J3 and J8. With basic Verilog and VHDL skills, it's easy to change their use from logic to GPIO or vice versa, as well as apply application logic to them. For convenience, these are given as vector ports with the names "J3" and "J8", for which the position in the vector corresponds to the pin on the connector: The Verilog / VHDL signal J3[0] goes to physical pin J3/3, J3[1] goes to J3/4 etc. up to J3[33] going to J3/36. The same arrangement applies for J8.
Four of these pins are pulled up with resistors on the Lite IO Cape board: J3[19], J3[18], J8[28] and J8[31].
There are additional connectors on the Z-Turn Lite IO Cape board, whose pins are all physically shared with J3 and J8. The board's schematics shows which pins are shared. No pins are shared between J3 and J8, so accessing only these two makes for a full utilization of the Cape IO board's pin exposure.
The HDMI connector and the push button are independent, and share no pin with neither J3, J8 nor any of the other connectors.